


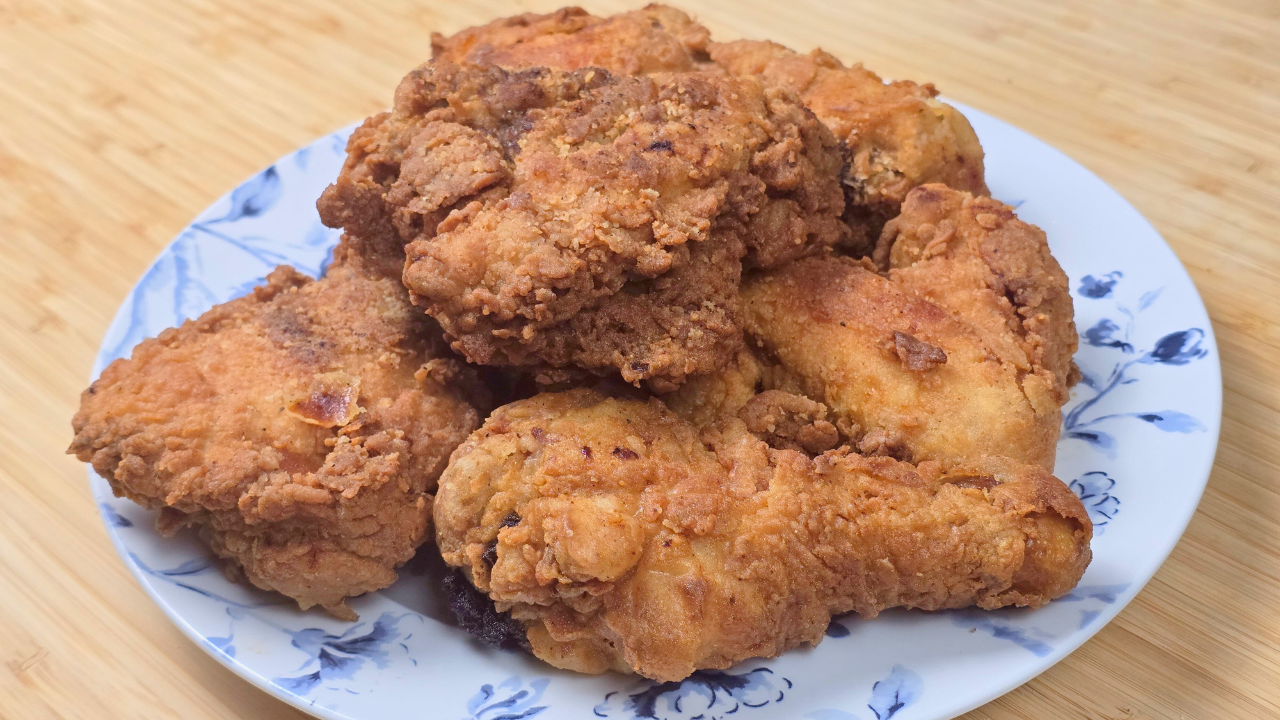
If you were to ask anyone what’s my favorite thing to eat for dinner, bar none, the answer would be Fried Chicken. There’s just something about the succulent meat, the crispy exterior and the salty flavor that really gives a sense of comfort that you can’t easily get with most other dishes. The trouble is, much of the chicken I’ve had is either under seasoned, it’s been fried too hard as the meat is too dry, or it’s very thin on the breading which ends up way too soggy. After testing countless times, I’ve found this recipe addresses each and every one of those shortfalls to make for the perfect fried chicken, and I’m happy to share it with you!
Key Ingredients for Crispy Fried Chicken
This Fried Chicken is made with your standard ingredients: flour, a blend of spices, oil for frying and table salt. That said, what makes this recipe stand out from the rest is the use of Buttermilk, Cornstarch as well as Baking Powder.
- Buttermilk vs. Pickle Juice: The not-so-secret way to get juicy chicken is by soaking it in a highly acidic liquid. The acid will help to break down the proteins in the meat which will tenderize it, as well as make it easier for the seasoning + moisture to penetrate deep into the meat (versus just coating the surface). Some will soak their chicken in pickle juice, but I prefer to soak my chicken in Buttermilk. Unlike pickle juice, the higher fat content in the buttermilk gives the chicken a much deeper golden-brown crust. Also, the thick & creamy consistency of the buttermilk makes it easier for the breading to adhere to the chicken once you coat it and fry it.
- Baking Powder: Why, you ask? It’s for a couple of reasons. When the baking powder reacts to both the heat and the moisture in the chicken, it will dissolve and create carbon dioxide which will leave tiny air pockets in the batter. This will give the fried chicken a coating that’s more on the lighter plus fluffier side and not so dense. Also, the baking powder help to lower the pH (technically known as Power of Hydrogen or also colloquially known as potential hydrogen) on the skin of the chicken, which is what helps the batter to brown more quickly and evenly while it’s frying. This also aids with increasing the overall crispiness of the chicken as it cooks.
- Cornstarch: Why? For a few reasons. The cornstarch helps to break down the protein in the flour, which limits the development of gluten and helps to keep the fried chicken skin from becoming tough while it’s frying. In addition, cornstarch does a great job at absorbing and holding liquid during the cooking process, which helps keep the inside of waffles moist while subsequently preventing the exterior of waffles from becoming soggy, thus contributing to fried chicken’s crispy crust as well as a juicy interior. And the best part about cornstarch? Despite what the name implies, cornstarch is favorless with virtually no distinctive taste, so you don’t have to worry about your chicken tasting like corn once it’s finished.
And that’s all there is to it. While this has been categorized as a dish for dinner, it it often enjoyed by many for lunch as well. By the time you finish reading this post, you will also be a pro at making this dish yourself. When your family comes to you begging to have KFC, Popeyes, Bojangles or Church’s for dinner, you can tell them “We got fried chicken at home!”
Tips for Making this Recipe
Don’t overcrowd the pan. This is the most common cause of soggy fried chicken skin. When you place the relatively cool chicken pieces into the hot skillet, because the cooler air is much denser, it will cause the temperature of the oil to drop. When the oil temperature drops too much, the breading will struggle to brown evenly and quickly. This is why you should only add so many chicken pieces into the skillet at a time and make sure they have plenty of space for breathing room. If necessary, it’s best to cook the chicken in batches to ensure the ideal outcome. Using multiple skillets at once to cook the fried chicken at the same time works as well.
Use aluminum-free baking powder. Another mistake that people often make, although this is mostly from a lack of knowledge, is they’ll buy specific brands of baking powder at their grocery store without realizing it contains aluminum (aluminum is an acidic compound that can activate baking soda). Usually, if there’s a ton of sugar in the recipe, that will mask the metallic taste from the aluminum. But in dishes such as fried chicken (where there isn’t much sugar or honey), the metallic taste will be quite apparent and it can ruin the chicken. This is why I recommend using baking powder that’s aluminum-free. A brand I recommend is Rumford, which is sold at most major grocery stores in the US.
Ensure baking powder is fresh. You should always be mindful of the expiration date on your baking powder before you put it to use. Perhaps the biggest issue people encounter when they’re making biscuits or baked goods in general is that they’re using extremely old baking powder. While most brands of baking powder can remain active for months or even years, because many people don’t use it often, it can end up sitting in the cabinet and before you know it, the expiration date is in the past. When this happens, the biscuits will fail to rise properly in the oven because it is no longer active. That’s why you should always ensure your baking powder has not expired.
User thermometer to check / monitor oil temp. Back in the day, our grandmas would often use the back of a wooden spoon or even flick a bit of flour into the grease to check & see if the oil were ready. This is in part because thermometers for cooking weren’t nearly as accessible nor affordable. And while all of those methods will work in a pinch, they’re also far from precise. To ensure you’re getting a completely accurate reading of the oil temperature as it warms up and while the chicken is frying, I recommend using a meat thermometer. A good meat thermometer should run you no more than $25, which is well-worth the investment for the best results.
Frequently Asked Questions
Why are the best sides to serve with Fried Chicken?
As far as what’s considered the best sides with fried chicken, this is very much subjective. If you ask me, the best side (which is my favorite) would be french fries or potato wedges. Traditionally, people would serve fried chicken with starches such as mashed potatoes or macaroni & cheese along with some kind of vegetable (the most common vegetables being green beans, sweet peas, corn or broccoli). Regardless of which sides you choose, they would all be best if made fresh from scratch (in my humble opinion).
Can you substitute the Baking Powder for Baking Soda?
The problem with baking soda is that it lacks an acidic compound that is contained in baking powder. Without that acidic component, once it is activated during the frying process, it can make for fried chicken skin that’s unpleasant as there’s nothing to neutralize the bitter and metallic taste that the baking soda produces on its own. So for this recipe, I don’t recommend using baking soda in place of baking powder.
Are there any good alternatives to seed oils?
The answer to this question always gets tricky.
I do understand that there are varying opinions on the use of seed oils in the cooking process. In such cases, there are several alternatives that you *COULD* use for frying, but with a couple of important caveats. While animal fats such as lard or duck fat can been used for fried chicken, the biggest issue i they have a relatively lower smoke point than many of the commonly used seed oils, which leaves them susceptible to smoking (thus setting off alarms) as you cook, and even possibly burning the chicken. Beef Tallow does have a somewhat higher smoke point than the 2 aforementioned fats, but the biggest prohibiting factor with it for many individuals is cost (it’s quite expensive).
The other caveat is that the use of non-seed oils will change the flavor profile of the chicken. Seed oils (I.E. Peanut Oil, Canola Oil, etc.), are known to be neutral-tasting (meaning they have no flavor). While refined coconut and avocado oil are considered *MORE* neutral compared to other non-seed oils, they still tend to have a very distinct flavor that can be imparted into your chicken and overpower the spices/herbs.
All of that said, the short and sweet answer I can give you is I don’t recommend it. For a more detailed answer, see above.
How can I keep my fried chicken warm after frying?
For those who have yet to master the art of cooking all of your food at the same time, or for those who may not be ready to eat immediately, it’s never fun having to eat cooled-off food that should be enjoyed hot. That said, something you can do with help prevent this from happening is by preheating your conventional oven to 200*F (93*C) and then placing the finished fried chicken inside the oven until you’re ready to eat or serve it. Be careful not to abuse this though, as keeping the fried chicken in the oven for too long will cause the hot and arid air to dry it out.
How long can you store fried chicken?
As long as the fried chicken is stored in a airtight container or bag, they should be safe to eat for at least 3 days. After 3 days, they may begin to lose their flavor & texture. Once 5 days have passed, I would advise that you dispose of the chicken as it may no longer be edible.
Try These Other Dinner Recipes
Best Crispy Fried Chicken Recipe
Equipment
- 1 Whisk
- 1 Large Mixing Bowl
- 1 Small Mixing Bowl
- 1 Large Cast-Iron Skillet, Electric Skillet or Saute Pan (12-14")
- 1 Tongs
- 2 Gallon Storage Bag
- Plastic Wrap or Aluminum Foil
- Cooling Rack
- Measuring Cups/Spoons
Ingredients
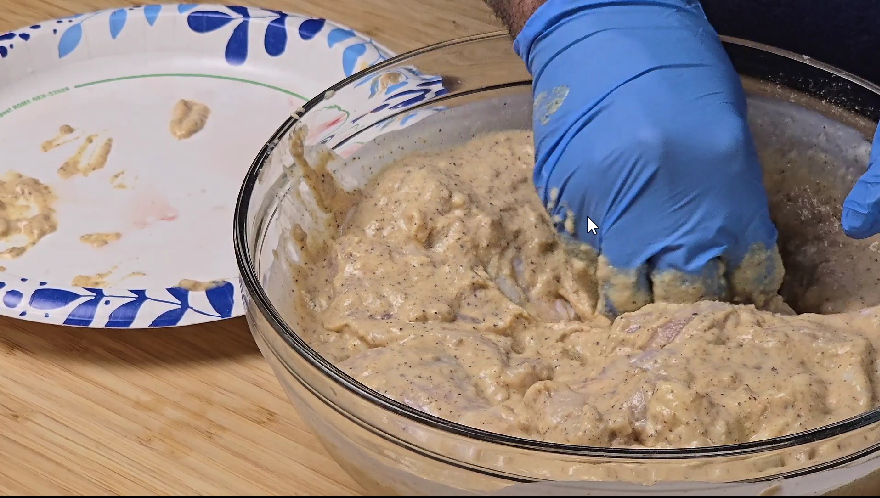
Wet Batter
- 1 Cup All-Purpose Flour
- 2 Cups Buttermilk
- 2 Eggs
- 2 TBSP Garlic Powder
- 2 TBSP Onion Powder
- 1.5 TBSP Iodized Salt
- 1 TBSP Ground Black Pepper
- 1 TBSP Lemon Pepper
- 1/2 TBSP Ground Mustard
- 1/2 TBSP Cayenne Pepper
- 1/2 TBSP Ground Paprika
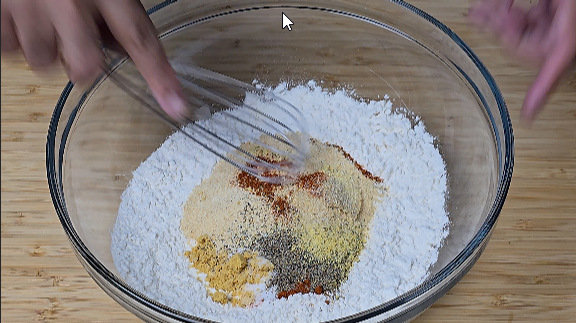
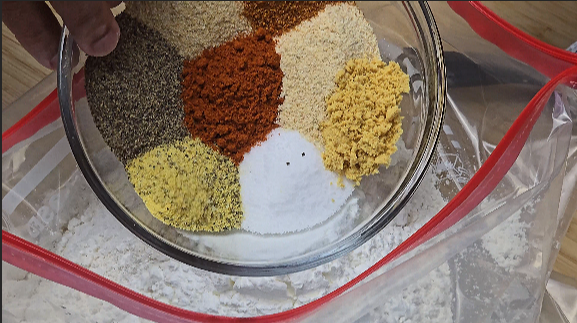
Dry Batter
- 4 Cups All-Purpose Flour
- 1/4 Cup Cornstarch
- 2 TBSP Baking Powder
- 2 TBSP Garlic Powder
- 2 TBSP Onion Powder
- 1.5 TBSP Iodized Salt
- 1 TBSP Ground Black Pepper
- 1 TBSP Lemon Pepper
- 1/2 TBSP Ground Mustard
- 1/2 TBSP Cayenne Pepper
- 1/2 TBSP Ground Paprika
Instructions
- In large mixing bowl, prepare wet batter by combining flour with eggs, buttermilk and herbs/spices
- Submerge chicken in wet batter until it's completely covered.
- Cover bowl with aluminum foil or plastic wrap and chill in refrigerator for 8-12 hours (or overnight).
- Remove bowl from refrigerator and allow chicken to warm so that it's not refrigerator cold.
- While the chicken rests, using storage bag, prepare dry batter by combining flour, cornstarch and baking powder with herbs/spices.
- Ensure storage bag is sealed tightly and shake vigorously until all of the ingredients are well blended.
- Carefully remove chicken from wet batter and dip into bag with dry batter
- Ensure storage bag is sealed tightly and shake vigorously until all of the chicken is well-coated.
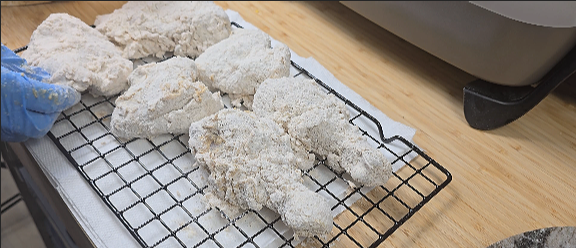
- Remove chicken from bag and allow it to rest for 15-30 minutes on cooling rack
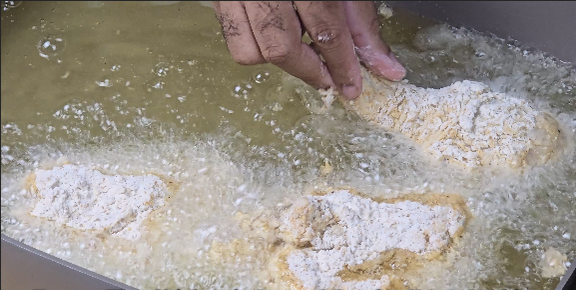
- While chicken is resting with batter, add oil to skillet (just enough to overtake entire bottom half of chicken) and warm on medium heat until it reaches 375*F (190*C)
- Once oil in skillet has reached 375*F (190*F), carefully lay chicken pieces down in skillet and allow to cook on first side for 6-8 minutes. Do *NOT* cover skillet.***
- After cooking on first side for 6-8 minutes, use tongs to flip the chicken and allow it to cook on other side for an additional 6-8 minutes.***
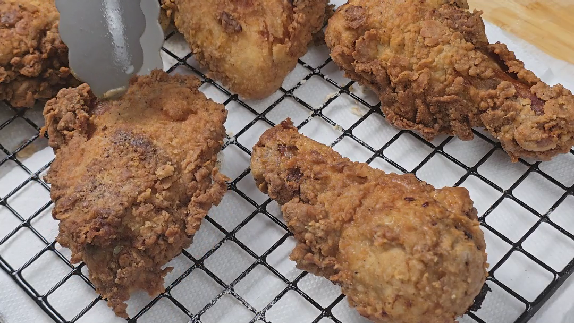
- Carefully remove chicken from skillet and place it on cooling rack (be sure to cover bottom of cooling rack with paper towel to account for any excess oil dripping), allowing it to cool/rest for 10-15 minutes.